Designing a mini-game
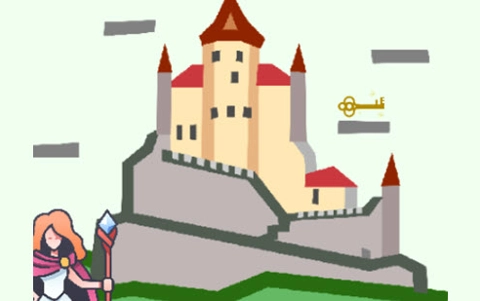
About this lesson
In this learning sequence, students are guided to design a mini-game for a targeted audience. They use a template to plan and record their ideas for their game, considering the main characters, theme and goal for their game. Students program their game using Scratch or a similar visual programming platform. Sample Scratch programs are provided for students to remix.
Year band: 3-4
Curriculum Links AssessmentCurriculum Links
Technologies – Digital Technologies
Years 3–4
- follow and describe algorithms involving sequencing, comparison operators (branching) and iteration AC9TDI4P02
- implement simple algorithms as visual programs involving control structures and input AC9TDI4P04
Digital Literacy: Creating and exchanging
Critical and Creative Thinking: Analysing
Assessment
Achievement standard
By the end of Year 4, students follow and describe simple algorithms involving branching and iteration and implement them as visual programs.
Use this Program my sprite task to assess students’ knowledge, skills and processes related to basic programming.
Use this rubric to assess student skills, processes and knowledge.
| 1 (limited) | 2 (basic) | 3 (proficient) | 4 (advanced) | |
|---|---|---|---|---|
| Knowledge of visual programming blocks | shows a limited understanding of visual programming blocks | names some visual programming blocks or describes their purpose | describes the purpose of the visual programming blocks and gives relevant examples to support their understanding | consistently describes the purpose of the visual programming blocks and gives relevant examples to support their understanding that illustrate blocks to enable input, to make decisions based on comparing data, and include repeat steps |
| Identifies control structures: investigating sample visual programs | with guidance, shows a limited ability to describe or identify blocks in given examples and with support can interpret the sequence of steps | identifies most block types in given examples and interprets the sequence of steps | consistently identifies block types correctly in simple program examples; interprets the sequence of steps and identifies user input, decisions (branching) and repeat steps (iteration) | shows a high level of accuracy in identifying block types of a range of visual programs; interprets the sequence of steps, predicts outcomes of blocks and identifies user input, branching and iteration; explains ways to enable input and make decisions and automate repeat steps |
| Producing and implementing visual programs | with guidance, creates a program in a sequence of steps to perform a basic task with limited opportunity for user input | creates a program with user input in a sequence of logical steps | creates a program with user input in a sequence of logical steps that includes a decision (branching) to provide the user with a choice | creates a program with user input in a sequence of logical steps that includes a decision (branching) and iteration (repeat steps); enables input and decisions and automates repeat steps |
Learning map and outcomes
Learning intention
To use the design of a mini-game to develop programming skills, design thinking and computational thinking.
Success criteria
Students will be able to:
- design a mini-game that has a clear purpose and is designed for a particular audience
- use branching and iteration to control the flow of their program.
Preparation and materials
- Teacher slides: Game design: Years 3–4 [PPT]
- Teacher slides: Game design: programming tips: Years 3–4 [PPT]
- Worksheet: Designing a mini-game [PDF]
- Worksheet: Game design template [Word]
- Scratch 3.0 desktop version or similar visual programming platform
Learning hook
In designing their mini-game, students will incorporate branching. Branching is where yes/no decisions are used to determine the next steps in a process or program.
One way to engage students in thinking about branching is to start by presenting a story where the students are the main characters, for example:
‘You’re walking in a forest and come across a fork in the path. Do you take the left path, which looks dark and mysterious, or the right path, which is bright and open?’
Ask students to make a choice, and then describe an outcome based on their decision, for example, one path leads to a cave, the other continues to a castle. Share different outcomes suggested by students. Explain that branching allows for different scenarios. What happens next depends on your choice. The cave might hide a treasure, or the castle could be guarded by a dragon.
You may want to use the Teacher slides to support this part of the lesson (see slide 2).
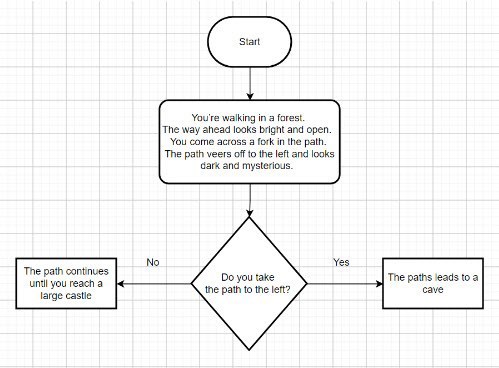
Image: Branching example created in draw.io
Discuss how this example can be written as an If/Then statement. For example, If the answer is yes, then switch to the cave backdrop. If the answer is no, then switch to the castle backdrop.
Explain that students will use similar If/Then decisions in their game design, where the game will proceed differently based on the player's choices or conditions. For example, If the player touches an enemy, then game over. This introduces them to how branching works in programming and game design.
In preparing to design their game, encourage students to connect the task to real people working in game design using the poster: Game design: Phoebe Watson. Encourage students to see how the concepts they're learning are used by professionals like Phoebe.
Learning input and construction
Refer to the Teacher slides to support this part of the lesson. The slides provide prompts and guidance on what to consider when designing a game in a sequential and logical way.
- Discuss the steps in planning a mini-game (slides 3 to 12).
- Use an example of a mini-game to explain how to record ideas following steps outlined in the worksheet: Designing a mini-game (slides 13 to 15).
- Discuss some basic programming skills needed to code the game (slides 16 to 18).
Provide the worksheet Designing a mini-game to guide students to think about their game, its purpose, the characters, theme and goal for each level. Students can collaborate on this task with a partner, which will also be useful for the programming component of this lesson.
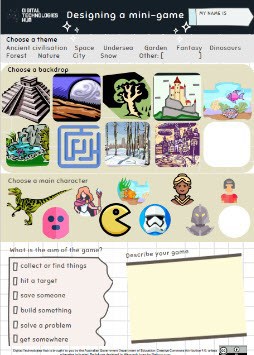
Image: worksheet Designing a mini-game
Have pairs of students discuss their game design with another pair, sharing ideas and giving and receiving feedback.
Differentiation
- Students who have well-developed programming skills may choose to plan and design a three-level mini-game using the worksheet: Game design template printed to A3 size.
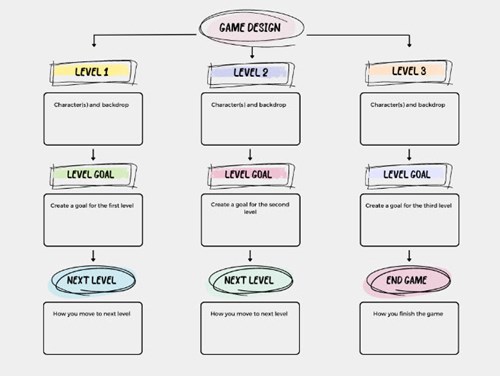
Image: Game design template
Learning demo
Students create a game in Scratch 3.0 or a similar visual programming language to include decisions, for example, using If/Then statements to trigger an event.
Provide examples of programming and discuss students’ ideas about how to code the different elements using the Teacher slides: Game design: Programming tips: Years 3–4.
While students in Years 3-4 are not required to understand variables from an assessment perspective, adding features like scoring or tracking lives can make their game more engaging. These features would require programming variables, which would typically be new for students and would require extra teacher support. Refer to the Game design lesson for Years 5–6 for additional guidance.
Differentiation
For students with limited programming skills, provide an alternative to Scratch, such as Microsoft Makecode arcade. Students can choose a game to make by following the self-paced tutorial that includes video and prompts to complete an existing game.
For students who benefit from exploring a program and seeing how it runs, provide an example to remix. They could remix a Scratch game that includes branching, such as Castle and key. Remixing is an effective teaching approach to support students to develop their coding skills.
Students could:
- remix the game using different sprites
- create a second level using elements of the game
- apply code examples to their own new game.
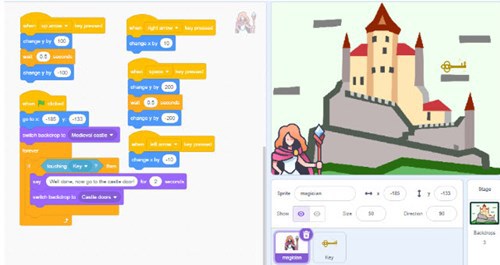
Image: Scratch game Castle and key
For students with well-developed programming skills, who want to add gameplay such as scoring, they may want to remix a Scratch game that includes variables, for example, Mazes and lives. Students could:
- remix the game using different sprites
- create a second level using elements of the game
- apply code examples to their own new game.
Reflection
Lead a discussion on the game design activity, asking prompt questions such as those below.
- Game design: ‘How did you ensure that your game was engaging and fun for the player? What elements of your design contributed to the overall user experience?’
- User input and control: ‘What types of user inputs does your game require (for example, keyboard, mouse)? How did you decide on these inputs, and how do they enable the player's control over the game?’
- Programming blocks (If/Then blocks): ‘How did you use If/Then blocks in your game? Can you explain a specific example of how these programming elements helped you manage game events?’
Why is this relevant?
Designing a digital game draws on students’ computational thinking and critical and creative thinking. When creating a digital game for a specific audience, students consider user needs and how the game will meet those needs. Designing a game is an engaging way to apply branching and iteration to control the program's flow.
Note: In Years 5–6, students are expected to use variables, for example, for scorekeeping, tracking lives and timing.
Resources
- Teacher slides: Game design: Years 3–4 [PPT]
- Teacher slides: Game design: programming tips: Years 3–4 [PPT]
- Worksheet: Designing a mini-game [PDF]
- Worksheet: Game design template [Word]
- Scratch 3.0 desktop version or similar visual programming platform
- Scratch game example: Mazes and lives
- Microsoft Makecode arcade
- Video: Conditions | Lesson 6
- Poster: Programming infographic
- Learn more about teaching programming
- Career poster: Game design: Phoebe Watson [PDF]