Introduction to Ozobot and colour codes

About this lesson
Students are introduced to Ozobot and how drawing lines and colour codes can control it. This lesson allows students to experiment with different lines and codes to create a path for Ozobot to follow. This lesson idea was created by Steven Payne.
Year band: 1-2
Curriculum Links AssessmentCurriculum Links
Links with Digital Technologies Curriculum Area
| Band | Content Description |
|---|---|
| F-2 |
Follow and describe algorithms involving a sequence of steps, branching (decisions) and iteration (repetition) (AC9TDI2P02). |
Assessment
Formative Assessment:
- Teachers observe students using the Ozobots, creating their algorithms and debugging.
- Use questioning to elicit student understanding of the functions of the Ozobot and their algorithmic thinking.
- You might take photos of the students’ work to document their progress, or record the Ozobot in their final demonstration.
| Quantity of knowledge | Quality of understanding | ||||
|---|---|---|---|---|---|
| Criteria | Pre-structural | Uni-structural | Multi-structural | Relational | Extended abstract |
| Algorithms Codes |
No algorithm or colour codes shown | Algorithm only shows a limited number of instructions which are not linked – possibly use of different colour lines. | Algorithm has enough instructions to complete the task but not linked or not linked in the correct sequence – or there are codes that do not work. | Algorithm has instructions linked in the correct sequence to achieve the task – Ozobot can follow a path as designed using colour codes. | Algorithm brings in prior learning and/or independent learning beyond the task and possibly includes additional colour codes. |
| Vocabulary | When describing algorithm, no specific vocabulary is used. | The terms instruction or code may be used as a general description. | The term algorithm is used as a general description. | The terms algorithm is used confidently with specific reference to learner’s work. | Specific vocabulary like decisions and repetition is used, going beyond the set language. |
Overview
Resources
- Ozobots
- Blank white paper
- Markers/textas in colours black, red, light blue and light green (recommended: Ozobot pens, Sharpie wide chisel tip or Crayola markers), one set per group
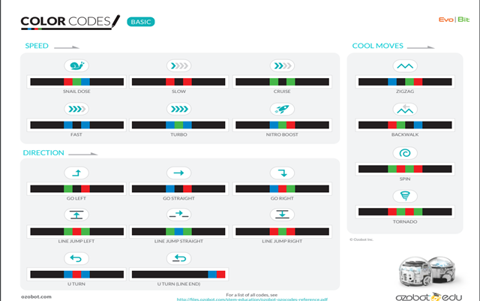
- Colour codes downloaded and printed
- Ozobot activity sheets (pages 8-10)
(Instead of paper, you can also code Ozobot by drawing on tablets, using apps such as Explain Everything or OneNote.)
Prior Student Learning
Digital Technologies
It may be that students have done some prior unplugged algorithms (simple following and providing instructions).
Mathematics
Students have done some work on navigational language (left, right, forward, backward).
![]()
Additional scaffolding:
To further represent prior learning, you may want to review simple algorithms and/or navigational language by a whole-group discussion, a demonstration or activity, or a descriptive video. You can play the game ‘Simon Says’ or use examples from the lesson ‘Introducing Algorithms’. You may want to have definitions and examples on the whiteboard or on a handout so students have a reference during the lesson. For example, explain the concept of sequencing where you need to put things in a particular order. The lesson ‘Fairytale Fun’ demonstrates the importance of putting each part of the story in the correct order so that the story of ‘Goldilocks and the Three Bears’ makes sense.
Learning hook
Introduce Ozobot and explain how the robot works.
![]()
Limited, low or no vision:
This task can be modified for those students with colour-blindness or limited, low, or no vision. First, come up with a way to differentiate the four coloured felt markers by touch. For example, you can put thick tape, band-aids, or ribbons around each, so they feel different. Alternately, you could use scented felt markers. Next, you may want to create a tactile Ozobot Colour Code reference sheet so the student can check on different codes independently. Also allow the student to feel the Ozobot move along the paper, you can tape a feather or similar light material, to the top of the bot; something that the student can touch that will not affect the movement of the robot. You may want to use raised barriers so the student can easily orientate themselves within the play space when drawing the lines.
With a black marker, draw a line and show how Ozobot follows it.
Repeat for other colours.
Show Ozobots sensors on the bottom and explain that these are its eyes – it can follow lines and can see different colours.
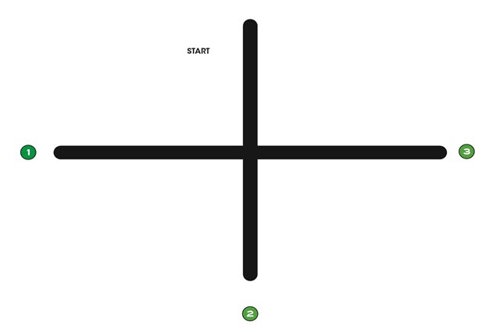
Draw crossing lines (or use print out) and ask students to predict what will happen when Ozobot reaches a junction.

Place Ozobot at the start, and repeat a few times. The turn is random, so run enough times to demonstrate this.
Were your predictions correct?
Learning map and outcomes
- Students describe the sequence of turns that Ozobot needs to make.
- Students work in teams to design their algorithm using a sequence of colour codes, that navigate Ozobot along a path.
- Students can draw paths, including colour codes and control Ozobot along the paths.
- Students can debug their algorithms and troubleshoot (line thickness, calibration etc.)
Learning input
Show how colour codes work. Demonstrate “Go right’ and ‘Fast’ as examples.
Explain that students are going to construct their own paths and make some paths for Ozobot to follow.
Ozobot is quite fussy, so you’ll need to work out how thick the lines need to be and what size to draw the colour codes.
Suggest checking that ink is dry before putting Ozobot on the line.
Learning construction
Students understand that Ozobots have sensors and follow lines and colour code instructions.
They work in small groups or pairs to construct paths using paper and coloured pens.
This is an opportunity for students to play and find out how to control the Ozobots.
Have codes printed and available or displayed at the front of the class. Example codes to start with:
Go Left, Go Straight, Go Right, Slow, Fast, U-turn
As students draw lines, teacher asks questions:
- Why did you draw this bit?
- What would happen if you added a line here?
- Would Ozobot always go that way?
(Perhaps have available some copies of activity sheet 3 from the Programming with colours worksheet.)
Learning demo
Once students have got working drawings and solved any problems, choose a couple of groups to present what they have created with the class:
- What does Ozobot do?
- What did you discover about the lines or codes?
- What worked well?
- What did not work well?
- Did you change anything?
Learning reflection
Bring together the observations from the learning demo and, with the students, come up with a list of rules, e.g.
- Thickness of the lines
- What size the codes need to be
- What works and doesn’t work with the lines (e.g. curves, turns etc.)
Resources
- Download entire Lesson Plan: PDF / Microsoft Word version.
- Ozobot web page
- Computer Science Education Research Group (CSER)
- This lesson plan corresponds to professional learning in the following CSER Digital Technologies MOOCs:
- F-6 Digital Technologies: Foundations
- Unit 7: Algorithms and Programming
- F-6 Digital Technologies: Extended
- Unit 2: Algorithms & Programming
- F-6 Digital Technologies: Foundations