Making maths quizzes 2: Implementing a digital solution

About this lesson
In this sequence of lessons students implement a digital solution for a maths quiz. They test and assess how well it works.
Year band: 5-6
Curriculum Links AssessmentCurriculum Links
Links with Digital Technologies Curriculum Area
| Strand | Content Description |
|---|---|
| Processes and Production Skills |
Design algorithms involving multiple alternatives (branching) and iteration (AC9TDI6P02). Implement algorithms as visual programs involving control structures, variables and input (AC9TDI6P05). |
Links with other Learning Areas
| Learning Area | Strand and Content Description |
|---|---|
| Mathematics | Number and Algebra Solve problems involving multiplication of large numbers by one- or two-digit numbers using efficient mental, written strategies and appropriate digital technologies (ACMNA100). |
Assessment
Assessment for learning
Anecdotal discussion around students' prior knowledge concerning both the key terms about and the functionality of the program.
Assessment as learning
- Observation of student teamwork
- Student self reflection, comparing their understanding of the key concepts with those displayed on the answer sheet
- Students self-reflect using the rubric as a guide. They colour the rubric in yellow to show where they think their level is.
Assessment of learning
- Final copy of group's plan.
- Use of the student assessment rubric by the teacher. The teacher colours in the same rubric that the students have used, but this time blue for their mark.
Learning hook
- Ask students if they are familiar with the term 'Hyperlink'.
- Facilitate a class discussion around this term, pulling out all their prior knowledge and recording their input on the board. Once their previous ideas have been discussed, start to deconstruct the term together.
- 'Hyper' in this context refers to something digital, or a digital system. 'Link' on the other hand, means to connect something, or to link to it. Therefore, a hyperlink is something that links to a document or a section of a digital system, such as a webpage or a section of text in a webpage or document.
- Every blue link that you find on a webpage is a hyperlink. Basically anything that you can click on and takes you somewhere else is hyperlinked to that location.
Learning map and outcomes
- Explain to students that in this lesson they are going to learn to implement a digital solution to create a program, and then test and assess how well it works.'
- Break this sentence down with them and discuss what skills they will need in order to be able to achieve this goal.
- What do you need to be able to do to create a digital program?
- How do we test it and how do we assess it?
Learning input
- Explain to the students that they are going to use hyperlinks to create the relationships between their questions for their program. They are going to use PowerPoint to make the slides, and then hyperlink each answer to its corresponding slide.
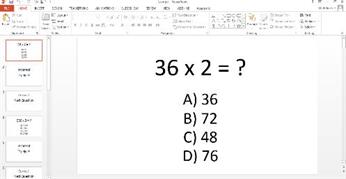
- Open the example PowerPoint again. Instead of going into 'slide show' mode, start going through editing section of the PowerPoint with the students. Show them how each slide is just a series of text boxes, one for the question and then four others for the answers.


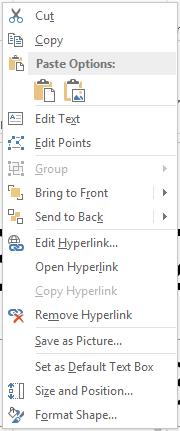
- Then explore how to hyperlink each answer to a different section of the PowerPoint. Right click on the answer that you want to link to a slide.
- Then select either 'Hyperlink' or 'Edit Hyperlink', depending on what is shown there. ('Edit Hyperlink' will appear if there is already a link established and attached to the text you have selected. 'Hyperlink' will appear if there has been no link previously made).
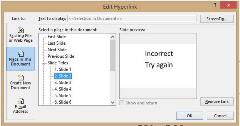
- That will then bring up a pop up. From here you can select 'Place in This Document.' Explain that there are a number of other options available, and that you can use these to link to sites online, or resources in other places.

- Explain that they will be using the Place in This Document option because they will be linking their answers to different slides within the presentation. They can find and select all the slides in their presentation in the panel in the middle, and can see the preview of the slide in the panel on the right.

- Tell students: 'So if you select Slide 2 here, then you they select the answer or text box (the one they just right-clicked on) it will take you to slide number 2.
Support modification: In order to support students who are particularly struggling with this learning sequence this learning sequence it could be differentiated by having students not make their tests adaptive.
Instead of having the tests branch from each right or wrong answer, simply have these students focus on making a series of questions that have right or wrong answers, and that then move on to the next question.
Learning construction
- Explain to the students that it is now their chance to create their program. Explain that they will still be working in their pairs that they planned their program in. They need to use the understandings they have just developed about hyperlinking, along with their plan, in order to create a series of linked slides that will play out as a mathematical quiz program.
- Emphasise that they are not to worry about word art or decoration at this stage, they are to simply get down their equations and link them to the right slides. This will take up enough of their time on its own.
Note: a common pitfall that students will potentially fall into here is not remembering that they need to make a new text box for each answer to their question. The text box is what the hyperlink links to. If they only have one box with all their answers in it, then they will only be able to link all their answers to one slide. They have to be separate in order to have separate links.
Learning demo
Once the students have finished creating their programs, tell them to test each other and see if there are any glitches or mistakes where they have linked to the wrong slide.
Once they have done this they can find another group that has finished and they can play each other's quiz.
Fast finishers: There are three main tasks that fast finishers can move onto:
- Extend their program as far as they can. Tell them to make it more complex or add some greater levels of difficulty.
- Decorate it and add a bit more customisation to the ‘feel’ of the program.
- Have students write a set of instructions for the quiz that could be included as the first slide. This would also measure their understanding of the task and could potentially make a good extension activity if the teacher wishes to extend this sequence over more lessons.
If they are still rushing on ahead, a further challenge you can give them is the question: 'Is there a way to add some kind of timer/countdown to each question?' See if they can come up with a solution to this.
Learning reflection
- At the end of the lesson bring everyone back together and facilitate a discussion recapping the main terms that they should have learnt throughout this sequence:
- IF statements
- OR statements
- Iteration statements
- Hyperlinks.
Explain to students that they have just 'programmed' their first game. - IF statements
- Ask students to look at their rubrics and assess themselves, filling in the boxes and scoring themselves accordingly.
- Ask them to jot down on their rubrics what they would do differently if they had another go at completing this task? What would they change?
- Ask them to jot down on their rubrics what they would do differently if they had another go at completing this task? What would they change?
- Finally ask students to write down any other uses they can think of for this sort of program? What else could they make in this way? These could include a spelling or grammar quiz, a choose-your-own-adventure storybook or a game. Students then share these ideas with the class.